
Energy Education
Teaching the Next Generation About Energy
Cape Light Compact’s award-winning energy education program reaches all corners of the Cape and Vineyard, providing classroom materials and technical support at the elementary through high school levels. We help launch energy clubs, sponsor skill-building competitions in Science Technology Engineering and Math (STEM), and underwrite and coordinate students’ participation in state and national energy fairs and competitions.
We also provide training, curricula, and tools that are consistent with Massachusetts frameworks to help teachers incorporate energy education into any classroom.
Energy education is fun, and it helps to build awareness, communication, and problem-solving skills all vital to building a sustainable energy future for the Cape and Vineyard.
Programs for Schools, Clubs, and Educators
The Compact is committed to supporting teachers, students and school districts with standards-based curriculum, hands-on materials, teacher training, and classroom support and strives to continue our mission to promote an energy educated and literate society. With a host of innovative energy and sustainability awareness programs, the Compact’s education program offers up to date information, teacher-tested lessons and educational support from our pool of tried and true science teachers. We strive to create effective networks of educators and energy experts to support classroom teachers with training on energy topics and concepts outlined in the science frameworks. The topic of energy is a great way to introduce and involve STEM lessons as well as other inter-curricular activities. Best of all, our programs are FREE!
In addition, we donate and loan schools educational materials that are comprehensive, experiential and teacher-friendly. We offer in-class support through special class visits, support for “energy clubs” through the Kids Teaching Kids model and teacher workshops and graduate-level professional development courses.
Our Programs
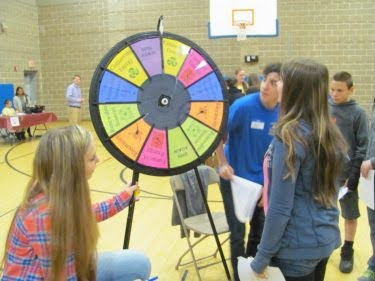
This program is primarily for elementary students and works well with fourth-grade energy curriculum. The carnival is made up of a series of booths where small groups of students (3-5) spend 5 minutes at each booth learning a different aspect energy. Our staff can adapt the program to fit your school’s needs. Traditionally, our staff works with schools to train middle or high schoolers to facilitate the program and booths with oversight provided by the Compact. Our materials are provided by the Compact at no cost to the school.
This program is ideal for middle school students and teaches them about home energy efficiency including heating/cooling, insulation, and building envelopes. The curriculum was developed by the National Energy Education Development Project and can be found here. The Compact is happy to help train teachers in facilitating this activity and/or provided the needed materials.
The compact will come to environmental or energy clubs and present on any relevant topics including our programming, power supply, and energy efficiency.
The Compact partners with schools to sell our LED lighting packages offering 80% of profits to be returned to the schools.
As a member of the National Energy Education Development Project we can help coordinate training and send educators to NEED conferences. You can find a list of training, curriculum, and other resources on the NEED website.
We will work with you and your education programs to meet your needs and interests in energy topics.
Contact Jason Bertrand at jason.bertrand@capelightcompact.org and see how the Compact’s Energy Education Program can help energize your school!
Solarize Our Schools
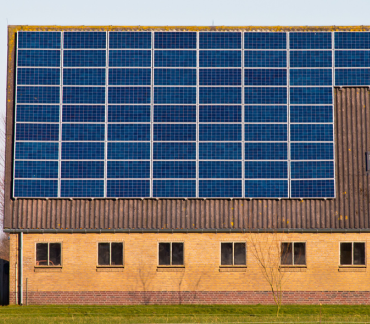
From September 2005 to December 2005, the 21 communities of Cape Cod and Martha’s Vineyard were challenged by Cape Light Compact and the Massachusetts Technology Collaborative to support renewable energy in their communities. Each community was challenged to sign up 3% of their residents for the Cape Light Compact Green program by December 31, 2005.
As a result of the Program and a grant received by the Massachusetts Technology Collaborative, the Compact was able to install 21 solar photovoltaic panels in each of the 21 communities.
We currently have 10 of those systems connected to an educational monitoring system.
Energy Sponsored Programs
Below is a sampling of past and present Cape Light Compact energy education sponsored programs:
- Bourne Middle School Energy Carnival
- Morse Pond Energy Camp
- Morse Pond Science/Energy Club
- Mullen Hall Science of Energy lessons
- Teaticket Elementary School Science of Energy lessons
- Education internships from Upper Cape Tech and MV Regional HS students
- Energy Carnivals led by Sandwich High School Students
- Forestdale SPIT (Solar Power Intelligence Team) and SPARKS Energy Clubs
- Barnstable Middle School After School Energy Club
- Eastham Elementary Energy Army
- Wellfleet Elementary School Energy Carnival
- Orleans Elementary School Energy Carnival
- Hydrogen Fuel Cell lessons at Chatham Middle School
- Nauset High School Green Team
- Harwich Middle School “Harwich Cares” Club
- Barnstable Horace Mann Charter School Energy Carnivals
- Harwich Middle School “Energy Day”
- Cape and Island Boy Scouts of America “Innovation Day”
- Truro Central School Energy Carnival
- Provincetown High School Energy Film Festival
- MV All-Island Energy Carnival at Oak Bluffs
- MV 5th Grade Solar Car Race
- Dennis/Yarmouth High School Career Day
- Barnstable Science and Nature Day
- All Cape Teacher’s In-Service STEM training day at Cape Cod Community College
- Eddy School (Brewster) 5th Grade produced Energy Carnivals to area schools
- Cape Cod Museum of Natural History Science on the Streets Festival
- Educator workshops for MA Audubon Society
- Bourne Middle School Energy Savers Club

